To program a garage door remote, press and release the Learn or Program button on the opener motor, then press the remote button within 30 seconds. The opener lights blink when it has learned the code. Car buttons and older openers need a few extra steps, covered below.
You don't need a technician or the old remote for any of this. You need a stepladder, a remote with a good battery, and about half a minute of focus once you start. This is the same advice our technicians give Metro Atlanta homeowners in the driveway.
What changes the steps: three kinds of opener
Every opener in a Georgia garage falls into one of three groups, and the group decides which steps work. Look at the back or right side of the motor unit on the ceiling, near the thin antenna wire that hangs down. Chamberlain, the company behind LiftMaster, Chamberlain and most Craftsman openers, puts its Learn button there.
- A colored square or round button marked Learn. LiftMaster, Chamberlain or Craftsman. The color tells you the generation (table below).
- A Program button with LED lights, or a button marked Learn Code. Genie. Genie moved its openers to a rolling-code system it calls Intellicode in 1995, so the code changes every time you press the remote.
- A row of tiny switches and no button. An old fixed-code opener. The switches set one code that never changes. Skip to the DIP-switch section.
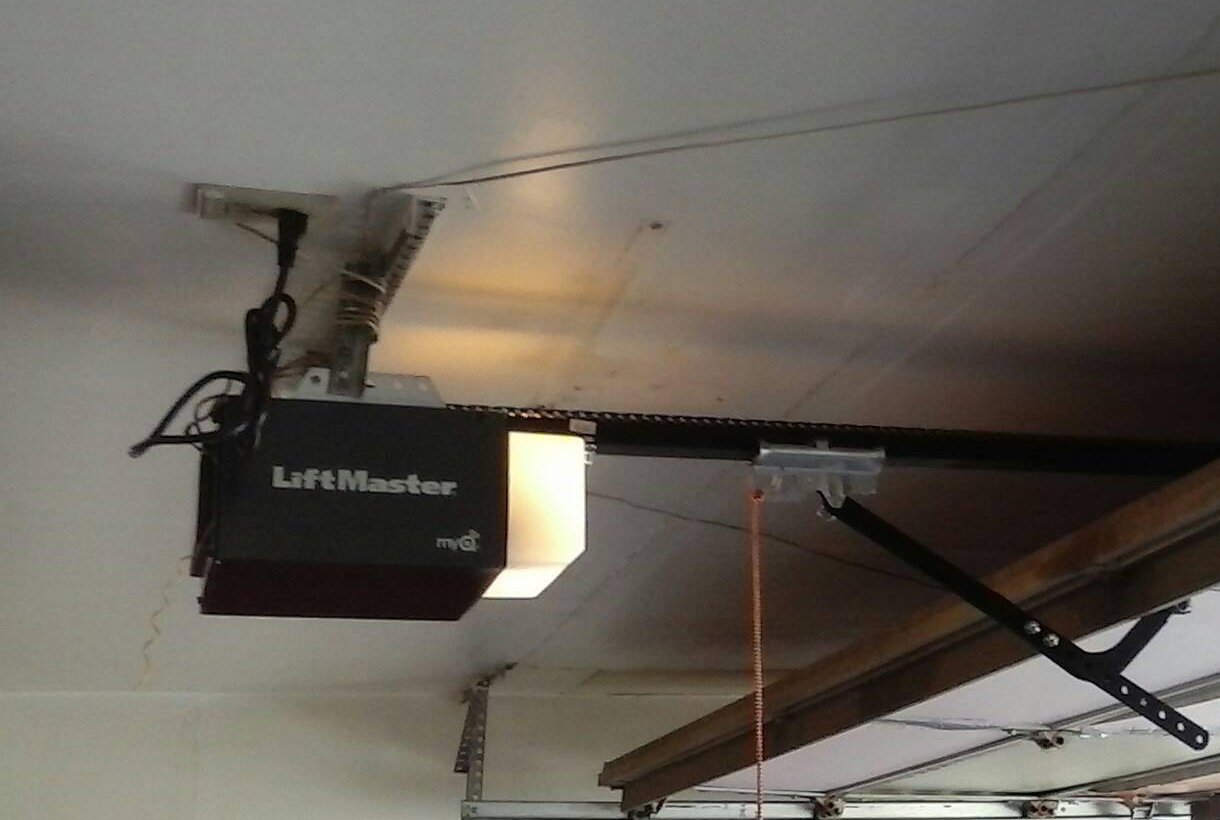
LiftMaster, Chamberlain and Craftsman: read the button color
Chamberlain publishes a compatibility chart that matches each Learn button color to the years it was built and to the remotes that still work with it. This is the short version.
| Learn button | Years built | Current remotes Chamberlain lists for it |
|---|---|---|
| White | 2025 to now | All current models, including the L991S, L993S and L932M |
| Yellow | 2011 to 2022 | L932M, L993M, L992U, and keypads L979M and L979U |
| Purple | 2005 to 2014 | Same list as yellow |
| Red or orange | 1997 to 2005 | Same list as yellow |
| Green | 1994 to 1997 | Only the universal L992U remote and L979U keypad |
If the color has faded and you can't tell purple from red, the model number on the opener's label settles it. A green-button opener is about 30 years old. It still learns remotes, but the choice of remotes is down to two universal models, and that's a good moment to price a new opener.
LiftMaster, Chamberlain and Craftsman: three ways to add a remote
At the motor (works on every color)
- Clear the doorway. The door moves at the end of this, so keep people, pets and the car out of its path.
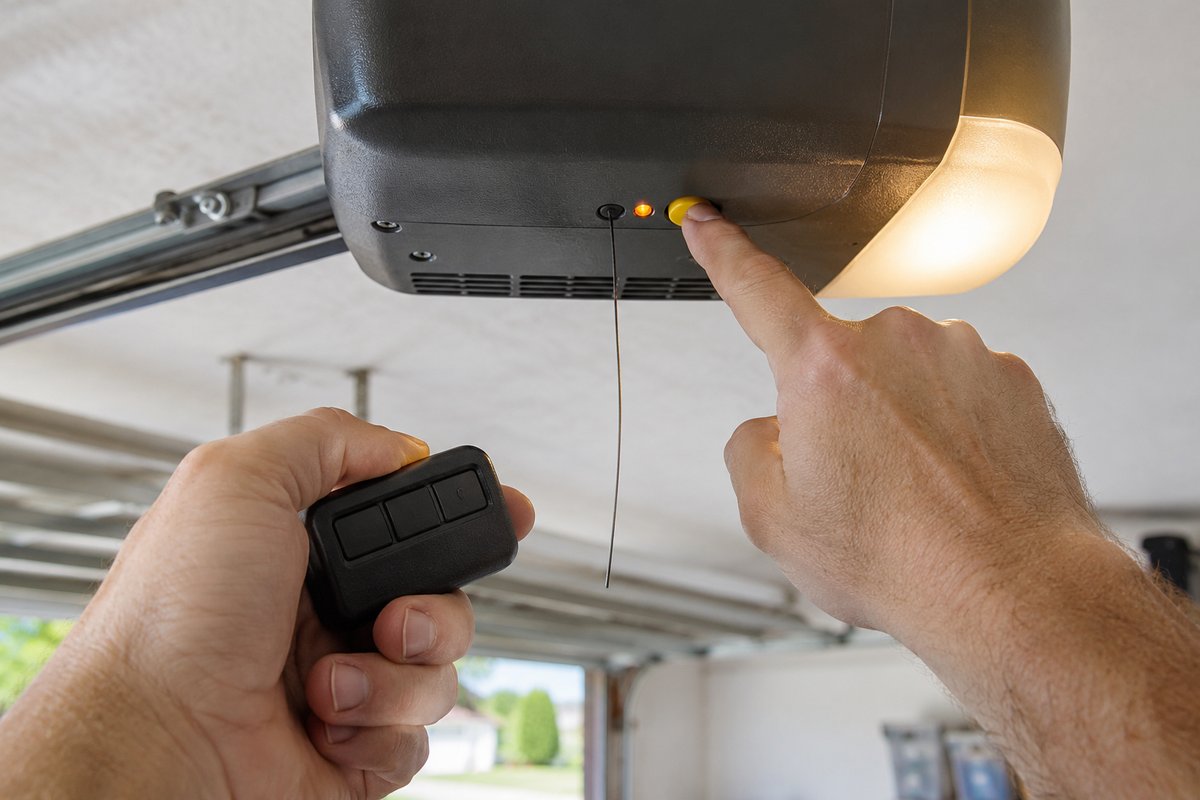
- Climb the ladder with the remote in your hand. Find the Learn button next to the antenna wire. On some models it sits behind the light lens.
- Press and release the Learn button. Tap it the way you'd press a doorbell. The small LED beside it lights and stays on for about 30 seconds.
- Inside those 30 seconds, press and hold the button on the remote you want to use.
- Let go when the opener lights blink or you hear two clicks. That's the signal the opener has stored the remote.
- Press the remote button once more to check that the door runs.
Each button on a multi-button remote is a separate code. To run a second door or a gate from the same remote, repeat the steps at the other opener with the second button.
At the wall control (no ladder)
Many LiftMaster wall controls have their own Learn button, so you can program from the ground. LiftMaster's support guide gives the steps: press and release the Learn button on the wall control twice, wait for its LED to start blinking, then press and hold the remote button within 30 seconds. The opener lights blink or you hear two clicks when it's done. If nothing happens, check that the LED was blinking before you pressed the remote and try again.
Wall controls with a screen use a menu: Program, then Remote.
White Learn button openers
The white button marks Chamberlain's newest radio system, Security+ 3.0. Use a remote listed for the white button and follow the card that comes with it, since Security+ 3.0 accessories have their own pairing steps. The difference shows up with car buttons, which we cover in the HomeLink section.
Don't hold the Learn button down. On these openers, holding Learn until the LED goes out, about 6 seconds, erases every remote and keypad stored in the opener. If that happens by accident, nothing is broken. Program each remote again.
Genie: Program button or Learn Code button
Genie's steps depend on what's on the motor. These come from Genie's own programming instructions for its current three-button remotes.
Openers with a Program button and two LEDs (current models):
- Press and hold the Program button until the round LED turns blue, then let go.
- The round LED goes out and the long LED flashes purple. You now have about 30 seconds.
- Step back so you're at least 5 feet from the opener.
- Press and release the remote button slowly, twice. The opener's LEDs flash and go out, which means it took.
- Press the same button a third time. The door should move. If the LEDs are still lit, press the button a few more times.
Openers with a Learn Code button (built 1995 to 2011):
- Press and release Learn Code once. The red LED starts flashing.
- From at least 5 feet away, press the remote button slowly twice within 30 seconds, then a third time to run the door.
On Genie openers from 1995 to 1997, only the two upper buttons on the remote will program. Later openers accept any button. Genie's current remotes take a CR2032 coin battery, and a fresh battery is worth fitting before you start. See our Genie garage door opener page if you're weighing repair against a new unit.
Older openers with DIP switches
A fixed-code opener has no Learn button. It has a row of small switches, usually behind the light lens or a cover on the motor, and the remote has a matching row under its battery door. Ford's support page gives the easy test: a circuit board with no switches means rolling code; a row of small switches means fixed code.
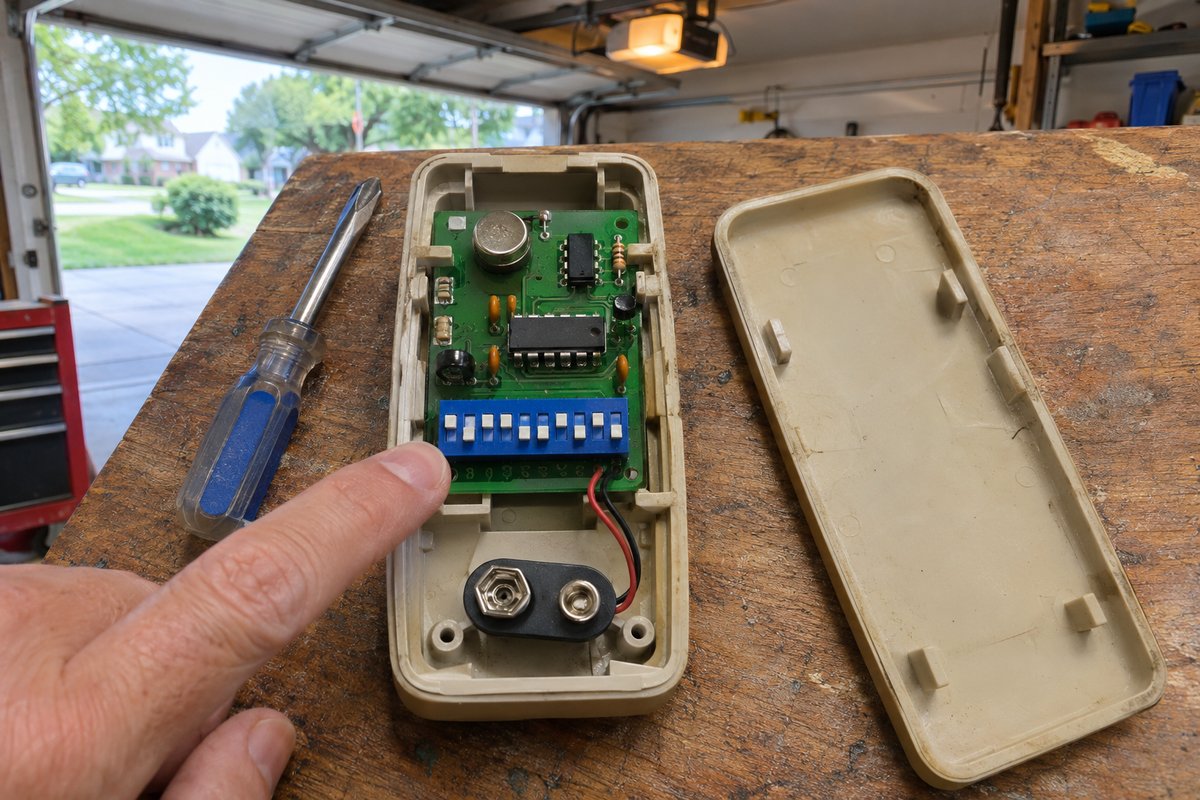
To program the remote, open both and set each switch on the remote to match the opener, one position at a time. Some switches have a middle position as well as up and down. Avoid all-up or all-down patterns, since those are the first a stranger would try.
The bigger issue is age. Since January 1, 1993, federal safety rules have required residential openers to have external entrapment protection, such as the photo-eye sensors near the floor, along with automatic reversing. The U.S. Consumer Product Safety Commission published those rules in 1993. Many DIP-switch openers were built before then. If yours has no photo-eyes, replace the opener before you spend money on remotes for it. Our guide to garage door opener types compares chain, belt and wall-mount openers.
Universal remotes and clickers
A universal remote is built to learn more than one brand. You tell the remote which opener it's talking to, usually by holding its own program button until its LED lights and then pressing a brand code or button, and then you finish with the opener's Learn button exactly as above. The details differ by model, so keep the instruction card.
Chamberlain lists two universal models, the L992U remote and the L979U keypad, as working with other brands' openers. It also says it can't give programming steps for those other brands, so have your opener's manual or model number handy. Universal remotes from the clicker family take a 3-volt CR2032 coin cell.
Before you buy, check the box lists your opener brand and your Learn button color or Genie generation.
Your car's buttons: HomeLink or Car2U?
Most cars with three buttons on the visor, mirror or overhead console use one of two systems, and they program differently. Ford's support page gives a simple way to tell them apart:
- HomeLink: three buttons, a small house-shaped icon, and one indicator light.
- Car2U: three buttons, each with its own light above it. You'll find it on some Ford and Lincoln models, among others.
Two safety rules apply to both. Park outside the garage while you program, because the door moves during the process. And if the engine needs to run, never run it in a closed garage. Ram's owner's manual warns that exhaust contains carbon monoxide, which you can't see or smell.
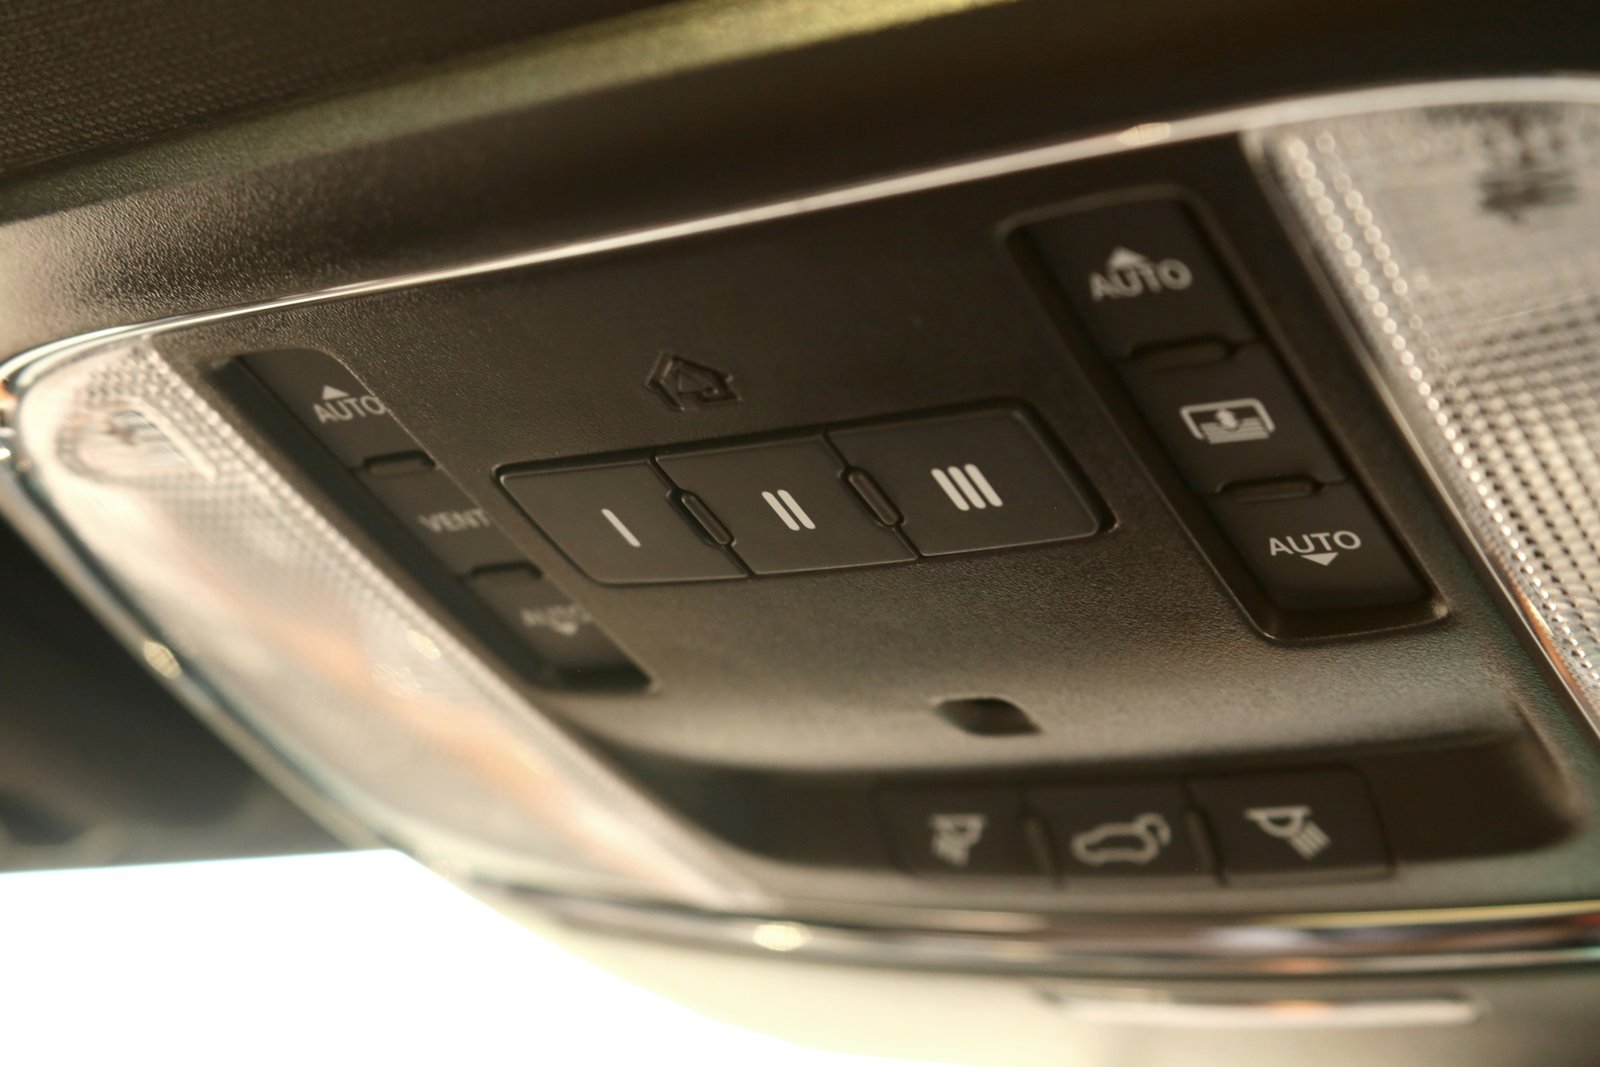
Photo: WillisMoon, CC BY 4.0, via Wikimedia Commons.
HomeLink: teach the car, then the opener
HomeLink is made by Gentex. Programming is two stages: the car copies your handheld remote, then the opener accepts the car.
Stage 1, in the car:
- Put a fresh battery in your handheld remote. Kia's manual notes that a new battery makes the training more reliable.
- Turn the ignition on.
- Hold the handheld remote 1 to 3 inches from the HomeLink buttons.
- Press and hold the HomeLink button you want and the remote button at the same time.
- Watch the HomeLink light. It flashes slowly, then rapidly. When it flashes rapidly, release both.
On an old fixed-code opener, the HomeLink button now runs the door, and you're done. On any rolling-code opener, which covers every Learn button color and every Genie opener described above, you need stage 2.
Stage 2, at the opener:
- On the motor, press and release the Learn button, the same doorbell tap as before. On a Genie, use the Program or Learn Code button.
- You have 30 seconds. Go back to the car. A second person in the driver's seat makes this easy.
- Press the programmed HomeLink button and hold it for 2 seconds, then release. Do this up to three times, until the door moves.
- Press it once more to confirm.
White Learn button (Security+ 3.0): HomeLink's support page says these openers must be paired using the original handheld remote, not at the motor. Do stage 1 with the handheld remote that came with the opener, and follow the HomeLink video for Security+ 3.0 if the car doesn't pick it up.
Older car, yellow-button opener: some older HomeLink versions can't talk to a yellow-antenna Chamberlain, LiftMaster, Craftsman or Raynor opener built since 2011. HomeLink points owners of those cars to a Compatibility Bridge Kit, which sits between the car and the opener. Check your car's HomeLink version on homelink.com before buying one.
Car2U: the outer buttons first
Car2U works the other way round: you start at the car, finish at the opener, and the timing is tight. These steps come from a Lincoln owner's guide; read your own manual's version first, since a missed step times out and you start over. Keep the key on and the engine off, with the car outside the garage.
- Press the two outer Car2U buttons together for 1 to 2 seconds, then let go.
- At the motor, press the Learn button. You now have about 10 to 30 seconds.
- Back in the car, press and hold the Car2U button you want for 5 to 20 seconds. Its light blinks slowly.
- Release it within a second of the door starting to move. The light blinks rapidly until programming is finished.
- Press the button again. The door should move.
For a DIP-switch opener, Car2U has a separate fixed-code routine where you enter the switch positions from left to right. Ford lists a Car2U help line, 1-866-572-2728, in its manuals.
Selling or trading in the car
Clear the buttons before the car leaves your hands. HomeLink recommends erasing them when a car is sold or a lease ends. The exact buttons and timing are in your manual; Kia, for example, has you hold the left and center buttons for about 20 seconds until the light flashes.
Keypads: one line here, a full guide elsewhere
A wireless keypad pairs with the same Learn button: tap Learn, enter a new PIN on the keypad, then press and hold Enter until the opener lights blink. Choosing a PIN nobody can guess, resetting a forgotten code and the white-button keypads that use the myQ app all have their own page: how to set, change or reset your garage door keypad code.
Erasing every remote: after a move, or a lost clicker
When you buy a house, you inherit every remote, keypad code and car button the last owners ever paired, plus anything they handed to a cleaner or a contractor. The same goes for a remote that went missing from a car. Clearing the opener's memory cuts all of them off at once.
| Opener | How to erase all remotes and keypads |
|---|---|
| LiftMaster, Chamberlain, Craftsman | Hold the Learn button until its LED goes out, about 6 seconds |
| Genie with Program button | Hold Program until the round LED turns blue and release. Then hold the Up (+) and Down (−) buttons together until both LEDs turn solid blue |
| Genie with Learn Code button | Hold Learn Code until the LED stops blinking |
| DIP-switch opener | Set a new switch pattern on the opener, then match it on each remote you're keeping |
After the erase, program back only the remotes you have, set a new keypad PIN, and re-pair your own car.
The step people miss: the old owner's app. A Wi-Fi opener can still be linked to the previous owner's myQ account after the remotes are gone. Chamberlain's support article lists "you moved into a home with an existing myQ device" as a reason to factory reset, and the reset is what removes that link. On a yellow or white Learn button Wi-Fi opener, Chamberlain's steps are: hold Learn until the LED comes on and then goes out, release, and repeat twice more straight away; three beeps confirm it. On other colors, hold Learn until the LED goes out. The reset also clears remotes, keypads, myQ accessories and HomeLink, so plan to program everything again.
More ideas: our garage door security tips.
myQ in brief
myQ is LiftMaster and Chamberlain's app connection. Newer openers have it built in, and older ones can add it with a separate controller. It lets you see from your phone whether the door is open, open or close it from anywhere, and get an alert when it moves or is left open. When you close the door from the app, the opener flashes and beeps for several seconds before the door moves, so anyone in the garage has time to step clear.
App setup is separate from remote programming. Your remotes, keypad and car keep working whether or not you use the app. Chamberlain says remote operation from the app should be used only on sectional doors, not one-piece doors. We install LiftMaster openers with myQ built in.
When the remote still won't work
Work through these in order.
The remotes stopped, but the wall button works
Look at the wall control. If its LED is flashing constantly, the opener is in Lock mode, which shuts out the handheld remotes. LiftMaster's fix: press and hold the Lock button for 2 seconds until the LED goes solid. On a doorbell-style control, pressing the Learn button takes it out of Lock mode. If that isn't it, program the remote again, and if it still won't take, erase the memory and start fresh.
The remote only works close to the door
- Battery first. Fit a fresh one; the type is printed on the old battery.
- Then the bulbs. Chamberlain warns that low-quality LED bulbs can interfere with remote controls. If the range dropped after you changed the opener's bulbs, put an incandescent or CFL bulb back in, or use an LED bulb sold for garage door openers, and test again.
- Then the antenna. The antenna wire should hang straight down from the motor, not be folded up, painted over or cut short.
Every remote quit at the same time
Someone held the Learn button too long and erased the memory, or a myQ factory reset was done. Program each remote again. If the wall button is dead too, it isn't the remotes; start with our garage door won't open guide.
A brand-new remote won't pair
Check that the remote matches the opener. Compare the packaging against the Learn button color or Genie generation, or buy a universal remote that lists your brand.
The car won't learn the opener
Stage 2 was skipped, or the 30-second window ran out. Repeat it with a helper. On a white-button opener, use the original handheld remote. On an older car with a yellow-button opener, see the bridge kit note above.
The door responds, but doesn't move properly
If the remote makes the opener hum, click or run while the door stays put, the radio side is fine. Read why an opener makes noise but won't open. If the door starts up and stops, or feels heavy, a spring is the likely cause, and that's not a DIY repair. A door that reverses on the way down points to the safety sensors, covered in our garage door sensor problems guide.
What you can do yourself, and what needs a technician
| Safe to do yourself | Call a technician |
|---|---|
| Program remotes, keypads and car buttons | The wall button doesn't work either |
| Erase all remotes and reprogram the ones you keep | The opener runs but the door doesn't move, or the door feels heavy |
| Change remote and keypad batteries | The opener has no photo-eyes, or has DIP switches and you're replacing it |
| Turn Lock mode off | The opener won't learn any remote, even after an erase, which points to the opener's radio or logic board |
| Swap the opener bulbs | You want a new opener with myQ and remotes set up and paired for you |
| Factory reset a myQ opener after a move |
When to call us
Programming a remote is a job you can finish on your own. Call us when the opener itself is the problem: it won't learn anything, the wall button is dead, or it's old enough that replacement makes more sense.
We're an authorized LiftMaster dealer and repair LiftMaster, Chamberlain, Craftsman and Genie openers across Metro Atlanta. See our garage door opener repair and installation page or LiftMaster opener repair in Atlanta. We've served Metro Atlanta since 1999, we're rated 4.9 on Google with Over 4,000 Five-Star Reviews, and our office is open seven days a week, 7 AM to 8 PM. You get a written price before any work starts.
Call (678) 271-8918 or book a visit online.
Frequently asked questions
Do I need the old remote to program a new one?
No. The opener stores the code, not the remote. Press and release the Learn or Program button on the motor, then press the new remote within 30 seconds. The only exception is a car's HomeLink on a white Learn button opener, which learns from the original handheld remote.
How do I program a garage door remote without a ladder?
Use the wall control, if it has a Learn button. On many LiftMaster controls you press it twice, wait for the LED to blink, then hold the remote button within 30 seconds. Controls with a screen have a Program menu.
Will a LiftMaster remote work on a Genie opener?
A standard LiftMaster remote won't. Chamberlain's universal models, the L992U remote and L979U keypad, are listed for other brands' openers. Check the packaging for your brand before you buy.
Do Craftsman remotes work with LiftMaster openers?
Craftsman openers with a colored Learn button were made by Chamberlain and use the same color system. A remote listed for your Learn button color works on any of the three brands.
Why did all my garage door remotes stop working at once?
Usually the opener's memory was erased, by holding the Learn button too long or a factory reset. Or the wall control is in Lock mode, shown by a constantly flashing LED. Turn Lock off first, then reprogram if needed.
How do I stop the previous owner's remotes from opening my garage?
Erase the opener's memory, then program only your own remotes, keypad and car. If the opener has Wi-Fi, do a myQ factory reset as well, so the previous owner's app account loses access.
How do I erase my garage door opener from my car?
Clear the car's buttons using the steps in your owner's manual before you sell it or end a lease, as HomeLink recommends. On some cars, Kia's among them, you hold two of the buttons for about 20 seconds until the light flashes.
Why does my car's HomeLink blink rapidly but not open the door?
The car has learned the remote, but the opener hasn't learned the car. Press the Learn button on the motor, then within 30 seconds press and hold the HomeLink button for 2 seconds, up to three times.